пятница, 8 января 2016 г.

Felt Blooms – Guidelines

Felt Blooms – Guidelines

I really LOVE making flowers, especially out of felt. As I watch the material slowly blossom from between my own fingertips, my heart smiles a little bit. Honestly, there are MILLIONS (ok fine, more like 531,000) of tutorials for felt flowers out there. I think they are so popular because they can be sooo quick and easy. But personally, I think a blossom that takes a little more time, planning, and effort really makes a statement.
This post isn’t so much a step by step tutorial, but more the guidelines I follow when I make a felt flower. I pretty much make them in four stages: petal cutting, petal shaping, flower assembly, and finishing touches.
Stage 1: Cut the Petals
First, I pick a flower and do some “research”, which is my fancy word for doing a google image search for it. I’m basically looking for 2 things – the shape of the petals, and the fullness/density of the bloom. After this, I cut out seemingly millions of little squares in the colors I want (really, you probably only need 20 ish, depending on the flower). When I’m using different colors for a gradient effect, I try to size the petals differently to get larger as they go out. Finally, I meticulously cut each petal into the shape that I want. For this peony, I used about 20 petals, the smallest being about 4 cm wide, the largest being 6 cm wide.
STAGE 2: Shape the Petals
(clockwise) hot glue along the bottom edge, cup with thumb, backside, piles of petals!
Now, it’s time to make mounds of flat petals more lifelike! I take my hot glue gun, do a light line along the bottom edge (can you see it in the pic? :( ), and basically form the base of the petal into a “cup” using my thumb! REPEAT X 20
STAGE 3: Assemble the Flower
(clockwise) glue by edges, inner trio of petals, layers of petals!
Now is the fun part :) I take the smallest petals and try to figure out the best formation for the smallest, inner ring of petals. I’ll try 2, 3, 4, or 5 petals to see which looks best. After I figure it out, I glue the inner ring together by the edges. I then add petals one by one, layering out, gluing by the bottom of each petal (not the edges). For this peony, I ended up having about five layers of petals, going from cream, to very light pink, to a dusty light pink.
STAGE FOUR: Apply Finishing Touches
I like to add little embellishments, like leaves, or bits of lace, tulle, or netting. Different colors, textures, and some shine really ups the visual interest. I kept the embellishments light on this baby though, just sticking with a couple of leaves :)
By the end, there are a couple unsightly spots, namely the center of the flower, and the back of the flower. It’s easy to fill the center! I usually just glue or stitch in some pearls, beads, or buttons. Alternatively, you can make this furry felt roll up thing by taking a thin strip of felt, cutting notches (?) down its length, and then rollllling it up, using hot glue to secure :). For the back, I figure out what I want this flower to be (pin? headband? clip? belt?) and buy the necessary hardware (Michael’s, Joann’s, Walmart!). I cut a felt circle, just big enough to hide all the ugliness, and cut slits in it to slide a part of the hardware behind it. Can you see in the above pic how the top of the hair clip is covered by the felt, and actually directly glued onto the bloom? I then thoroughly hot glue the whole thing down!
And that’s it! Flower accomplished!
:) Have fun!

Felt Craft Projects: Mini Shamrock Banner

Felt Craft Projects:
Mini Shamrock Banner

If you like working with felt and want to do some felt craft projects for St. Patrick's Day, then give this banner a try! It's a cute little banner that's made up of different shamrock designs and simple embroidery stitches.
Decorating with this adorable banner is sure to bring the luck of the Irish to your home this St. Patrick’s Day! We have provided the complete instructions and template so you can easily create this banner yourself.
felt craft projects

Materials For Felt Craft Projects:
Mini Shamrock Banner

felt craft projects
What You Will Need:
  • Felt: Full sheet of olive green (9" x 12")
  • Green felt (4 or 5 shades)
  • Gold felt
  • Embroidery thread: gold, black, 4 – 5 shades of green
  • 6 green buttons (Size: 1/2" – 5/8" wide)
  • 2 large green buttons (Size: 3/4" – 1")
  • 6 green beads
  • Ribbon (15" long piece)
  • Pins and needle
  • Scissors 


    Instructions For Felt Craft Projects:
    Mini Shamrock Banner


    Step 1:

    Print and cut out the shamrock template for the banner. Trace and cut out the patterns with the following felt colors. Also the types of stitches used are listed by each photo:
    felt craft projects                                                                     
                                                                         

    Background - bright green felt, whip stitch in medium green thread.

    Shamrock - medium green felt, running stitch in light green thread. 

    felt craft projects                                                                     
                                                                         

    Background - dark green felt, whip stitch in light green thread.

    Shamrock - bright green felt, backstitch in medium green thread. 

    felt craft projects
    Background - medium green felt, whip stitch in light green thread.

    Letters - bright green felt, running stitch in medium green thread.

    Horseshoe - gold felt, running stitch in yellow/gold thread,French knots in black thread. 

    felt craft projects                                                                     
                                                                         

    Background - dark green felt, whip stitch in light green thread.

    Shamrock - olive green felt, backstitch in dark green thread. 

    felt craft projects                                                                     
                                                                         

    Background - bright green felt, whip stitch in medium green thread.

    Shamrock - dark green felt, running stitch in light green thread. 

    felt craft projects   
    Step 2:
    Now that you know what colors of felt and thread to use, cut out all the pieces from the patterns and then evenly space the 5 background felt pieces on the 9" x 12" olive green felt.

    Pin the 5 felt pieces into place so that the felt won't move as you are stitching them onto the banner. See photo F to see how this will look. Sew the pieces on using the whip stitch around the edge.

    Step 3:
    Now stitch the shamrocks, letters and horseshoe onto their appropriate background using the stitches listed above by each of their photos. Also see the photo at the bottom of this page as a guide.

    Step 4:

    On two of the shamrocks, outline them using the running stitch. You will then sew a button on each of the shamrock petals. See photos A and E.

    And on the other 2 shamrocks you will use the backstitch to outline the shamrock and to sew a swirl design in each petal. Then sew on a bead in the center of each swirl. See photos B and D.

    Step 5:

    Sew the letters on using the running stitch down the center of each letter. For the horseshoe, you will sew four French knots in black thread on each side of the horseshoe. Then in yellow thread, use the running stitch to finish sewing on the horseshoe. See photo C.

    Step 6:

    Using about 15” of ribbon, sew the ends to the top corners of your banner on the backside. Make sure your stitches are placed where they will later be hidden by the large buttons in the front. Now sew a large button in each top corner to cover the stitches from the ribbon.
    felt craft projects

    Step 7: Optional

    If your banner tends to bend forward while hanging on the wall, you could do this optional step.

    Cut about a 1" X 8" strip of cardboard and glue it to the back of the banner. See photo G. Only glue the two ends of the cardboard strip and be sure to place the glue right behind the two large green buttons. This way no glue will show from the front. You could use any type of glue you would like, but we would suggest using hot glue.


    Your Mini Shamrock Banner is now finished!

    felt craft projects

    For more felt craft projects or sewing craft ideas, click the link below and see our other fun and easy craft ideas.

четверг, 7 января 2016 г.

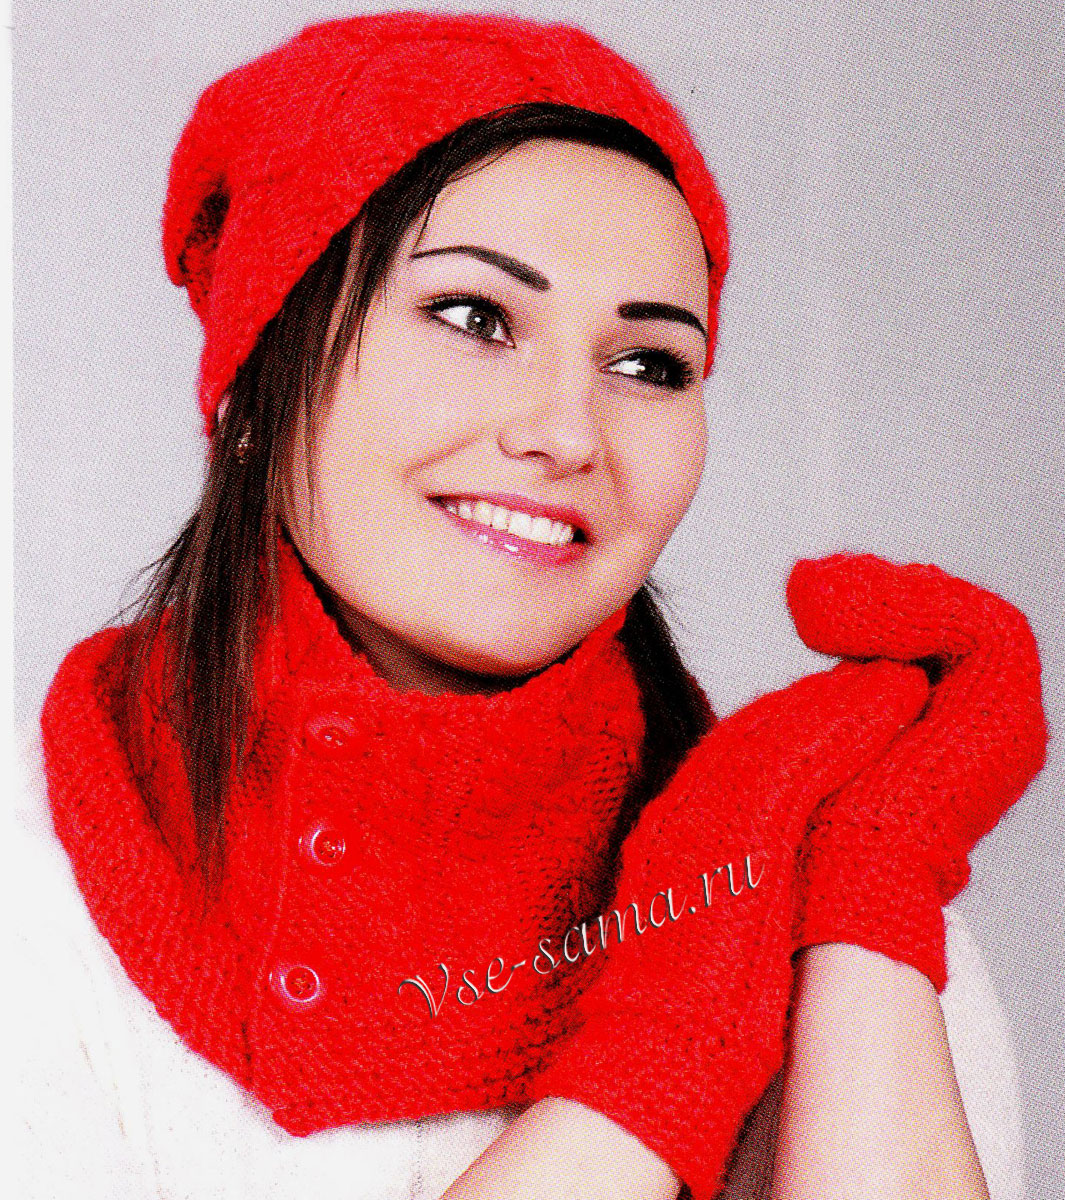
Комплект для зимы

Комплект для зимы

Комплект для зимы, фото

Материалы:

  • 400 г пряжи красного цвета (100% шерсть, 380 м/100 г),
  • круговые спицы № 3,
  • пуговицы в тон пряжи - 3 шт.
Лицевая гладь: лицевые ряды -лицевые петли, изнаночные ряды - изнаночные петли.
Изнаночная гладь: лицевые ряды - изнаночные петли, изнаночные ряды - лицевые петли.
Платочная вязка: лицевые и изнаночные ряды вязать изнаночными петлями.
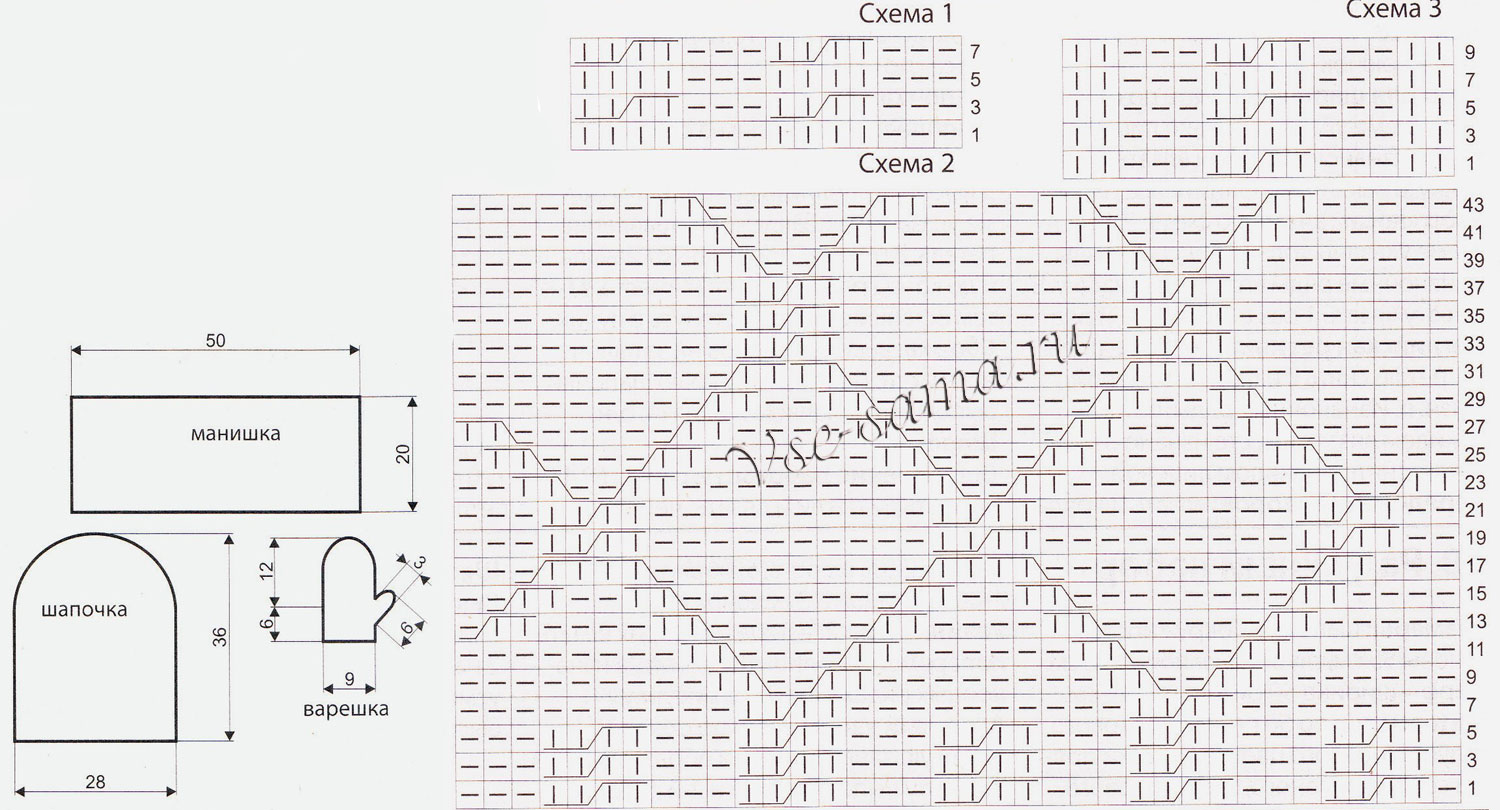
Узор для манишки: вязать по схеме 1. На схеме указаны лицевые ряды, изнаночные ряды вязать по рисунку. В высоту повторять с 1-го по 4-й ряды.
Узор для шапочки: вязать по схеме 2. На схеме указаны лицевые ряды, изнаночные ряды вязать по рисунку. В высоту указаны все ряды.
Узор для варежки: вязать по схеме 3. На схеме указаны лицевые ряды, изнаночные ряды вязать по рисунку. В высоту повторять с 1 -го по 4-й ряды.

Описание вязания манишки

Набрать 122 п. и вязать 4 см платочной вязкой. Продолжить вязание, распределив петли следующим способом: кром., платочная вязка - 5 п., узор по схеме 1-110 п., платочная вязка - 5 п„ кром. На планке, с правой стороны вязания, для пуговиц на равном расстоянии друг от друга выполнить петельки.
На высоте 20 см от наборного ряда петли закрыть.
Комплект для зимы, фото 2

Описание вязания шапочки

Набрать 100 п. и вязать по схеме 2. На высоте 24 см от наборного ряда петли разделить на 6 условных частей. Для формирования донышка шапочки в каждом лицевом ряду убавить 6 раз по 1 п.
На высоте 36 см от наборного ряда петли закрыть.
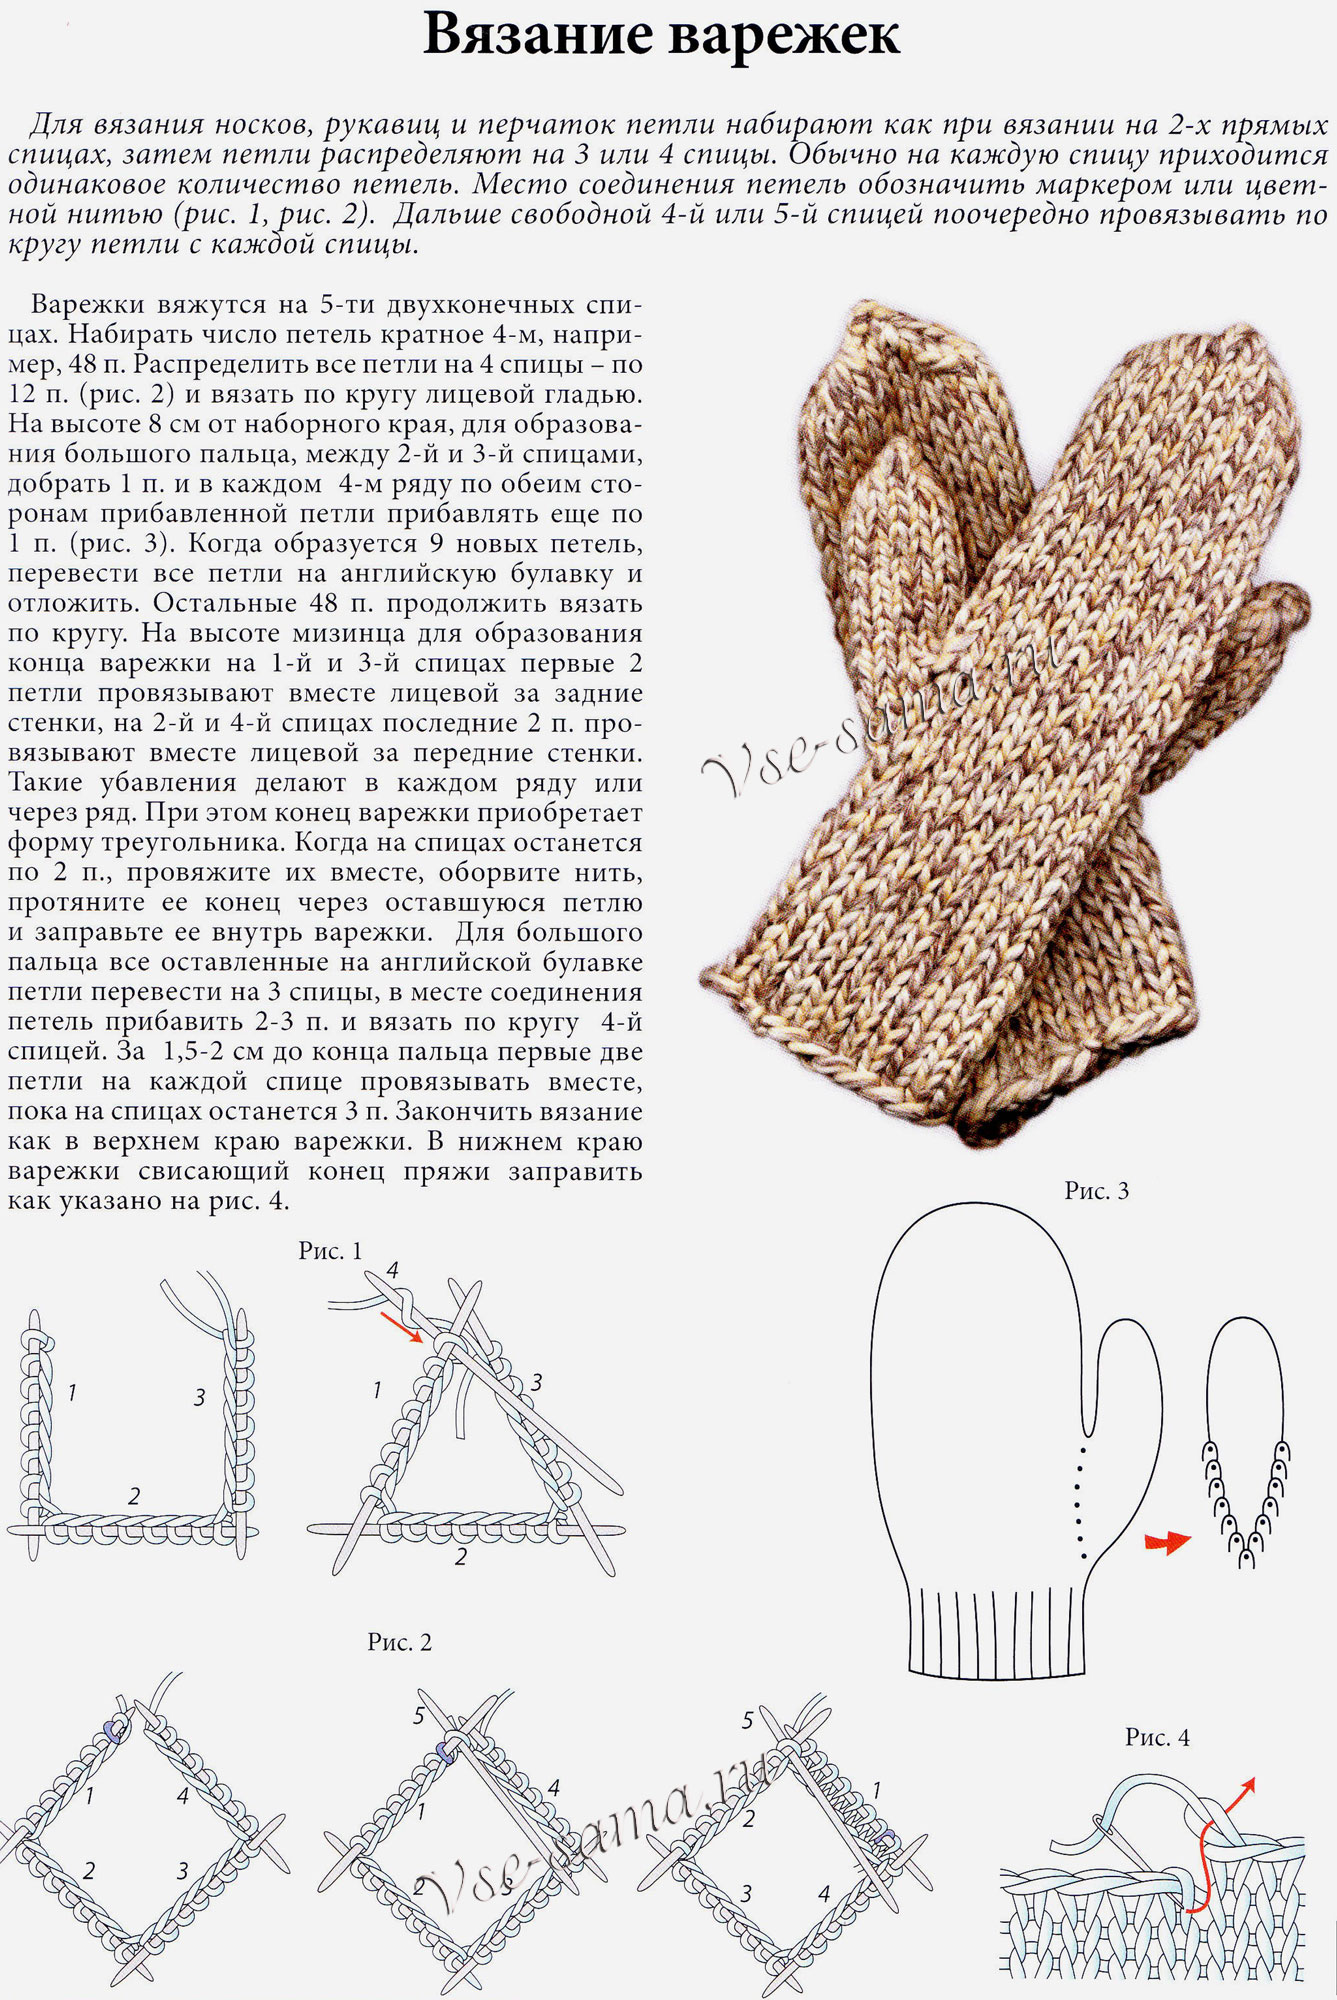
Варежки: см. мастер-класс ниже.
Мастер-класс по вязанию варежек

Сборка

Пришить пуговицы. Выполнить задний шов шапочки.

Схемы и выкройка для вязания комплекта:

Схемы и выкройка для вязания комплекта

Вязание спицами "Варежки монохром"

                                                     Варежки монохр
ом


воскресенье, 22 ноября 2015 г.

Tutorial - Wet Felt Making for Beginners

This tutorial will show you how to make a basic piece of flat felt.
Anyone can make felt – it’s easy.  To start, all you need is some inexpensive equipment:
Materials
a sushi mat, some merino wool top/roving, bar of Olive Oil Soap, soap flakes - we grate our own flakes from the bar of soap, some small-bubble bubble-wrap, a piece of tutu netting and a clean milk container (with holes punched in the lid) containing some tepid water and 2 tsp of soap flakes.
The following steps will show you how to make a piece of flat felt and from there you can then make a lot of things -for ease, this tutorial will show you how to make drinks coasters.
1. From your merino wool, pull off a tuft as shown in the photo.  Never cut the wool as the blunt edge will not felt well.  Keep your hands about 15cm apart to gently pull the tuft of wool off.
Pulling Wool Top
2. You can make felt just using one colour, but if you want to add a bit of interest, try using 3 colours at the same time.  A quick way to blend the colours is to pull off 3 tufts,
Mixing Colours 1  Mixing Colours 2  Mixing Colours 3
then lay them one on top of the other, grasp the ends and pull gently apart.  Lay the 2 tufts one on top of the other and repeat until you get the colour mix you want – stop before it gets muddy.
3. Spread a piece of bubble wrap (bubble side up) on your work surface and lay out some tufts of wool on it, as shown, horizontally.  (The size to be a rough 30cm square.)
First Layer   
4. Lay more tufts to cover the first layer, but this time lay them vertically.
Second Layer
5. The third layer should be horizontal, the same as the first layer.
Third Layer 
6. Carefully place a piece of netting over the wool.
Laying Net On Wool 
7.Sprinkle water over the wool through the net – don’t over wet.
Sprinkle Water onto Wool 
8. Push down all over the wool, through the net, with flat hands until you feel the water being taken up by the wool.  At this stage you will be able to determine if you need more water.
Push Water Into Wool 
9. Without disturbing the wool, gently rub soap across the net.  This is easier if you hold the net with one hand while soaping with the other.
Add Soap To Wool
10. Gently rub the wool, using a circular motion across the top of the net, for a few minutes.
Rubbing The Wool 
11. Carefully peel back and remove the net, releasing any trapped fibres, as the wool should be just about holding together now.  Carefully lift it off the bubble wrap and onto the sushi mat.
Remove The Net 
12. Roll the sushi mat up tightly and drain off any surplus water.
Drain Surplus Water 
13. Roll the sushi mat backwards and forwards for about a minute – if you put the sushi mat on an old towel, it will be easier to roll as it won’t slide about.
Roll The Felt 
14. Carefully unroll the mat and turn the felt through 90 degrees. 
Roll the mat up and repeat the rolling process for about a minute.
Repeat steps 13 & 14 after turning the felt over.
Repeat all steps, until the felt is ‘felted’.  You will know when it’s ready by doing the ‘pinch test’.  Pinch your thumb and forefinger into the felt and if you can pull the layers apart then it’s not felted – keep rolling until it’s ready.
15. Rinse the felt in tepid water to remove the soap. Do a final rinse in cold water - add a small dash of white vinegar to the water to help remove any soap residue - then pat the felt dry between two layers of old towel or kitchen paper.  Roll it again in the mat for a few seconds to flatten it.
16. Get a cookie cutter the size you want your coaster to be then press the cookie cutter firmly into the felt.  You will get an impression left in the felt that will give you a guide to cut around. 
Alternatively, you could cut around a template or cut freehand.
Mark The Shape    Scraps
Don’t throw your scraps away – dry them and keep for a needle felting base or card topping decoration or for incorporating into a new piece of felt or using for altered art.
17. Put your coasters onto the sushi mat.
Finishing 
18. Roll up the mat and roll the felt 10 times.
Unroll the mat and turn the coasters through 90 degrees.
Roll up the mat and roll the felt 10 times.
Repeat this process until the coasters have been rolled 4 times.
Turn the coasters over, turn them through 45 degrees then repeat the 4 times rolling process.
After this, the edges should be nicely felted in – if not, repeat until you’re satisfied.
19. Put the coasters in a warm place to dry – then enjoy them!
Finished Coasters